If you execute Git commands in your terminal, you might have noticed that on most Operating Systems it does not tell you which branch you are on. Although that is not a big issue, as you can retrieve the name of the branch you are currently on, it would be much more convenient if the branch name stays there all the time.
Basically, all you have to do is paste this at the end of your .bash_profile or your .bashrc file. Depending on your system, this file should already exist in your home directory. If it does not, simply create it.
This is what you need to paste
# You might want to add this to your .bash_profile and/or .bashrc file in your home directory
parse_git_branch() {
     git branch 2> /dev/null | sed -e '/^[^*]/d' -e 's/* \(.*\)/ (\1)/'
}

export PS1="\[\033[36m\]\u\[\033[m\]@\[\033[32m\]\h:\[\033[33;1m\]\w\[\033[m\]\\[\033[0;95m\]\$(parse_git_branch)\[\033[0m\]$ "
export CLICOLOR=1
export LSCOLORS=ExFxBxDxCxegedabagacad
alias ls='ls -GFh'
This works both on your Linux, as well as on Mac OSX. I tested it on my Ubuntu and my OSX 10.15 Catalina.
After you paste the above code, and after you save the file, close your terminal window or tab, and open a new one for changes to take effect. Or reboot your machine.
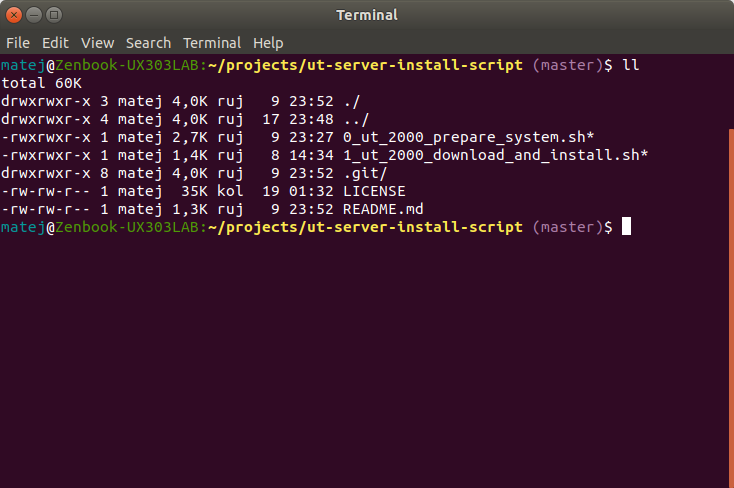
This is how it looks like
What if I want to get the branch name without modifying any of my files?
The command above shows all the local branches of your repository. The branch name with an asterisk (*) to it’s left is your current branch.
git branch | grep \* | cut -d ' ' -f2
This retrieves only the name of your current branch.
Although this works just fine, I personally think that having the branch name displayed right away is much more convenient. It’s up to you to decide. 🙂
You can set it up just to play around, to learn, or even to host a website or an app.
Who is this tutorial for?
This tutorial is for people who want to learn, or just play around with their own server, but don’t know where to start. Although this is sort of a step-by-step guide, I expect you to read it carefully, and google things yourself when you get stuck. There are a lot of different hardware combinations and you may encounter different issues than I have encountered.
What is in this document?
Here are my own personal instructions on how to do a basic installation and set up of the Ubuntu Server 18.04.
What do I need to get started?
You need:
An internet connection (obviously)
USB flash drive (at least 2GB)
A working PC with Windows or Ubuntu OS (this is for making a bootable USB drive – if you have another OS or you want to use another media for installation, such as DVD, please google it yourself)
A machine that will be your server and on which you will install the Ubuntu Server 18.04
Peripherals: keyboard (for the server machine) and monitor (for the server machine)
These instructions and Google
And some patience and time
Keyboard and monitor will only be needed for the initial setup. After SSH is set up, you will be able to connect to your server from another machine (laptop, smartphone, etc.) via SSH. and configure it from the command line.
For initial setup, I hooked up my server to my TV and plugged in my mini wireless keyboard. Later on, I was connecting to my server over SSH from my smartphone and my laptop computers.
What are the specs of my server machine?
My server machine is a Lenovo Q190. It is actually just a mini-sized desktop PC, but I will use it for playing around. Installing Ubuntu Server on a laptop, or a regular desktop PC will work fine if you just want to play around. If you want to host big applications and websites and if you expect 99.99% uptime or more, I suggest paying for a real VPS hosting.
If you use another platform (e.g. Mac) or tool, please google on how to create a bootable Ubuntu USB using that platform and tool.
Install Ubuntu Server on the machine
Setup BIOS
Set up your BIOS so you can boot from USB properly.
How to boot to BIOS and how to set the boot priorities is different from machine to machine. Google it on how to do it for your server. My server was configured to boot from legacy devices (such as USB drives) first, and then from HDD, so this worked for me out of the box.
Boot from USB
Put the USB to an empty USB slot, and boot from it. As said before, learn how to boot from USB on your hardware. Sometimes it involves pressing the F8 key on the keyboard during startup.
Install
Install Ubuntu Server following the installation instructions.
Installation instructions easy to follow. What I selected was:
English language
US keyboard layout
Croatian region
I did not set up the network (I did it after the installation)
I selected OpenSSH, DNS and LAMP from additional software section
I used the whole disk to install (with LVM)
I installed GRUB
If you don’t have Ethernet network, you can set up WiFi. If it does not work during the installation (like my WiFi), then you can try doing it after the installation. This will be covered in later sections. If you will be connecting your machine via ethernet (recommended), then you won’t need WiFi and you can set up the network during the installation. I recommend setting up a static IP address. It is easier if you always know the IP of your server, rather than constantly checking which IP DHCP assigned to your server after reboot (of server or reboot of the router).
During the installation install additional software packages if needed. I recommend installing OpenSSH at least. You will need it if you want to connect to your server remotely.
I installed DNS, LAMP, and OpenSSH so I can have fun with these at some later point. 🙂
If you miss installing something, you can always install it after the installation is complete and after you gain internet access.
Login using credentials specified during the installation.
Setup
Network and connectivity
Setup WiFi network
This is optional and you don’t need this if you are using Ethernet. Using Ethernet is recommended, as it is more secure and probably faster than WiFi. If you don’t have an option to connect via ethernet then you can use these instructions. If you are already connected via ethernet, then you can skip this step. You can also skip this step if you successfully connected to WiFi during the installation process.
Check your WiFi card
Find out the device name
Find your device name:
/sbin/iw dev
Mine is wlp3s0. Yours might be wlan0, or something else.
Check the device status (up or down)
Check status:
ip link show wlp3s0
If you see the word “UP” in the brackets – the interface is up. If there is no word “UP”, the device is down.
Set your wireless interface to “UP” state
If the device is up, you are good and you don’t need this step.
If it is down, bring it up:
sudo ip link set wlp3s0 up
You need root access (sudo) for this. You may also need it for some other commands we later use.
Now, repeat this to verify your interface is up:
ip link show wlp3s0
Scan the networks
Use this command:
sudo /sbin/iw wlp3s0 scan
Find the network you want to connect to (check the SSID for the name). Also, make sure your WiFi is protected by WPA/WPA2 (not WEP). These instructions are for WPA/WPA2. WEP is not secure enough. If you must connect to a WEP protected network (or even an unprotected network) please, google it.
Connect to your WiFi network
Let’s assume that your WiFi name (SSID) is MyNetworkName, and your WPA key is MyStrongPassword.
Create a new YAML file for netplan
Newer versions of Ubuntu use Netplan. Netplan is a simple way of configuring your network. More about netplan can be found here: https://netplan.io/
To create a new YAML file, simply copy the example YAML file into the right directory. Copying makes it easier for editing later on, as the copied file is already properly formatted, and indentation in YAML files is very important.
I encountered a lot of issues while setting up the WiFi. I can only say one thing after it all (after several reinstalls throughout the process) – use netplan only!
My WiFi card was not detected during the installation process. Later on, netplan did not work because a lot of packages were not installed (wpasupplicant, iwconfig, network manager, etc.).
In the end, what I did was – I inserted another USB wifi card into the computer. This other card was detected by the installation, but it still would not connect to my router. I installed the OS without setting up the network. Then I set up the WiFi using netplan using my USB wifi card. And after getting online with it, I just changed the name to my integrated WiFi card in netplan’s YAML file. After applying the config and rebooting everything worked like a charm – I had a static IP address and PC would connect to my WiFi on boot automatically. I really recommend using Ethernet cable if you can.
Install SSH
SSH Installation and setup
This is only needed if you did not install OpenSSH during the installation.
Also, if you have a more advanced router, consult the manual of your router.
This is how it looked like on my home router:
Later on, we will change the SSH port on our server from 22 to 222. It might be a good idea to forward the port 222 too in the same fashion (or whatever other port you will use). If you cannot get port forwarding to work on your home router provided by your ISP, then you may want to try to contact your ISP’s support for help.
Now that you’ve successfully forwarded your port, you can proceed to configure Dynamic DNS.
Dynamic DNS
If you are making this server as I do – configuring an old PC at your home – then most probably you don’t have a static public IP address. ISPs usually charge their private customers for a static IP address. And routers usually get a new public IP address from ISP provider every 24 hours or so. That means that your public IP address constantly changes and you cannot know your router’s IP address at all times. So, you won’t make much use of your port forwarding this way.
That’s where Dynamic DNS, or DDNS, or Dyn DNS comes in.
This is a service that maps your current public IP address to a domain name and updates it whenever it changes. So, if your DDNS domain is server.blabla.com, you will be able to connect to your router via port 22 using this hostname and you won’t need to specify the IP address. And DDNS takes care of public IP address changes.
When you register, you can create a DuckDNS subdomain.
Create it, and a token will be generated.
I set up domain as matej-server.duckdns.org.
Some router support DuckDNS to be entered in the router settings. If that is the case for your router, then you may enter the settings directly to the router. If not, then you may configure the Duck DNS service to run on your Linux server directly. For that, check this guide and click on linux-cron.
Add CNAME (Alias) to your zones if you have your own domain
Additionally, if you own a domain, you can add an alias to your Zones, so you can access your server with your own domain name.
If you own a domain blahblah.com, than you may create an alias server.blahblah.com to point to your DuckDNS hostname.
I own a domain on Bluehost hosting and this is how it looks like:
So now, I can access my server over SSH like this: ssh username@server.blahblah.com
What happens here is: server.blahblah.com points to matej-server.duckdns.org which points to my (current) public IP address, and when I send a request to port 22, the port forwarding does the forward to the request (with port 22) to the local IP address of my server (192.168.0.99).
Reboot again just to make sure everything is fine. If it does not work, reboot with sudo.
Fix bash history
If your .bash_history is owned by root and if your .bash_history is not appended across sessions (meaning, the content gets overwritten on the next login), then execute the following commands:
cd ~
sudo rm .bash_history
touch .bash_history
Use the following command only to verify that the file is there:
ls -la
shopt -s histappend
You don’t have to do this if your .bash_history file works fine.
Security
Disable passwords for SSH and use keys only
This adds more security to your server. Basically, what needs to be done is: generate key pairs on your client PC (PC that you will use to connect to the server over SSH), then put the key into the server and configure SSH to disable password logins.
I highly recommend doing this from your local network.
Generate key pairs on a client computer
I will write instructions on how to do it on another Linux Ubuntu-based computer. If you need to generate keys on a Mac it should be similar to Linux based computers. If you need to do it on a Windows machine, google for PuTTY (for connecting over SSH) and PuTTYgen (for generating keys).
Generate keys using this command:
ssh-keygen
Leave default path (just hit Enter) and if you want to enter a passphrase – enter it. If not, leave it blank and hit Enter. Passphrase adds more security, but for my server, I did not use a passphrase.
After that, you will get the location of your private and public key, as well as the fingerprint.
Now, copy the public key from the client to the server using this command:
ssh-copy-id username@ip_address
That is it. Keep note that you should never share your private key with anyone!
Now, you can connect to your server from trusted computers without specifying the password.
If you need to add more than one client computer from which you can connect to the server, you can generate as many keys as you want. I generated two more – one from PuTTYgen and one form JuiceSSH app on Android. I did not have the ability to use ssh-copy-id command, so I did the following:
I copied the contents of my id_rsa.pub file (that was generated). I connected to the server (from another trusted client). I pasted the contents of id_rsa.pub file into ~/.ssh/authorized_keys. Make sure you separate multiple keys with space(s).
Configure SSH and disable password logins
Connect to your server from a trusted computer using a key.
Open your SSH config file:
sudo nano /etc/ssh/sshd_config
Most of the properties described below are already in the file, but they are commented out. They represent the default values for those properties. It is a good idea to leave all the commented-out lines as they are, and add changed values below the original ones. It’s up to you.
Add the following lines (or change the commented-out ones):
Root login:
Original value
Change it to
Note
#PermitRootLogin prohibit-password
PermitRootLogin no
It may say “#PermitRootLogin yes” before you change it to “no”
/
AllowUsers username1 username2
This line does not exist. Add it and specify your username (the one that you want to connect with). You can add multiple usernames. I specified my user.
/
AllowGroups groupName1 groupName2
This line does not exist. Add it and specify your user group (that should be allowed). You can add multiple user groups. I did not add this to my server.
/
DenyUsers username1 username2
This line does not exist. Add it and specify the usernames that should not be able to access your server over SSH. I did not add this to my server.
/
DenyGroups groupName1 groupName2
This line does not exist. Add it and specify the user groups that should not be able to access your server. I did not add this to my server.
#Port 22
Port 222
Add a different port number. Default port for SSH is 22. However, if you change it to something else potential hackers would need to guess the port and this makes your server more secure.
#LoginGraceTime 2m
LoginGraceTime 1m
If you don’t log in successfully within a specified amount of time, SSH will disconnect. Lower this from default 2 minutes to 1 minute.
#ListenAddress 0.0.0.0
ListenAddress 192.168.0.99
Make SSH listen only to a specific IP address(es). If you need more IPs, just add multiple ListenAddress entries. Add an IP address of your network card (your static IP address).
#ClientAliveCountMax 3
ClientAliveCountMax 0
This indicates the total number of checkalive message sent by the ssh server without getting any response from the ssh client. Set it to 0 so no alive messages are sent from the client.
#ClientAliveInterval 0
ClientAliveInterval 600
This indicates the timeout in seconds. After x number of seconds, ssh server will send a message to the client asking for response. Default is 0. I set mine to 10 minutes (600 seconds)
#PasswordAuthentication yes
PasswordAuthentication no
Disables password authentication. After this change is applied you will only be able to connect using a key.
Additional notes:
You can use the combination of all the Allow and Deny directives. It is processed in this order: DenyUsers, AllowUsers, DenyGroups, and finally AllowGroups
If you set ClientAliveInterval to 60 and ClientAliveCountMax to 0, that means that after 60 seconds of being ide you will be disconnected. If you leave ClientAliveCountMax to 3, then with ClientAliveInterval of 60 you can be approx. 180 seconds idle before disconnect happens.
Be 100% your settings are correct, so you don’t lock yourself out of your server (if you do, you can still log into it physically by connecting peripherals)
Save the file and exit nano.
Now you need to restart the SSH service. If you restart it and you are connected to your server over the internet (through DDNS), then you will lose access to your server. That is because you changed your SSH port from 22 to 222, and your port forwarding forwards only to port 22. That is why I recommended doing these changes from your local network.
Restart SSH service:
sudo systemctl restart ssh
From now on, you connect to your server only via key with this command: ssh -p 222 username@ip_address (assuming you set your port to 222)
Important: If you have set port forwarding on your router, make sure you change it from 22 to 222.
Add custom Banner when someone connects via SSH
Although this does not really increase security, it may scare some novice attackers. Like the “no trespassing” sign would “scare” somebody people who find themselves in a place they should not be. The banner is usually displayed before the authentication.
Htop is a better alternative of top command. It makes monitoring of the system easy. It nicely displays RAM, CPU(s) and processes, and lets you manipulate processes.
Install it like this:
sudo apt-get install htop
rar and unrar
Lets you manipulate the rar files. Use rar to create compressed archives and unrar to extract them.
Install them using these two commands:
sudo apt-get install rar
sudo apt-get install unrar
Start crucial services on startup
If you need to start some crucial services on startup of your server, you can do so.
As of now, I cannot think of any services that are not run automatically. The ones I currently have are enabled to do that by default.
Check the link from “More resources” to learn more.
There you have it. Now you have your server configured. Doesn’t it feel nice to have a server on your own? 🙂
Dear hackers
If you hack this server you will hack a small PC that has no sensitive data and no useful information.
We can make your hacking skills useful to everyone
If you still want to hack this server, then it would be useful that upon a successful hack you contact me, and we assess the vulnerabilities used while hacking, fix it and add it to this document. This way both of us can contribute to the community.
If you still decide to hack and do mean stuff
Then you are just a mean person working against the community. If you hack me and remove everything from my disk, or copy everything from my server to your PC, you will get no real benefit out of it. You will just do harm to me, and to the community. I will be forced to shut the server down and delete this document, as it would mean that it is not good enough. We can have awesome articles on the internet that help people but hacking just nullifies all of my efforts here.
This blog will reside on the Programming category.
As a Java developer, I will mostly write about Java-related topics. I will explore other languages too, as well as some DevOps stuff.
Some of the topics that I am interested in are:
Java
Python
Spring Boot
Django
Design patterns
Docker
Linux
and many more
This is an ongoing journey but it does not take priority over my family life, so be patient with the upcoming content. 🙂
I am not sure if I’ll list all of my topics here in the future or will list only my highlights. Either way, this is just an introductory post that shows you my interests when it comes to programming.